Sunday, January 29, 2012

Wednesday, January 4, 2012
Bell-Locksburg Blade
I just became aware of this blade. It looks similar to the Sweetwater. You can learn more about it at http://www.arrowheads.com/flint-projectiles-and-knives/413-the-bell-locksburg-blade
Walnut Creek Pictures
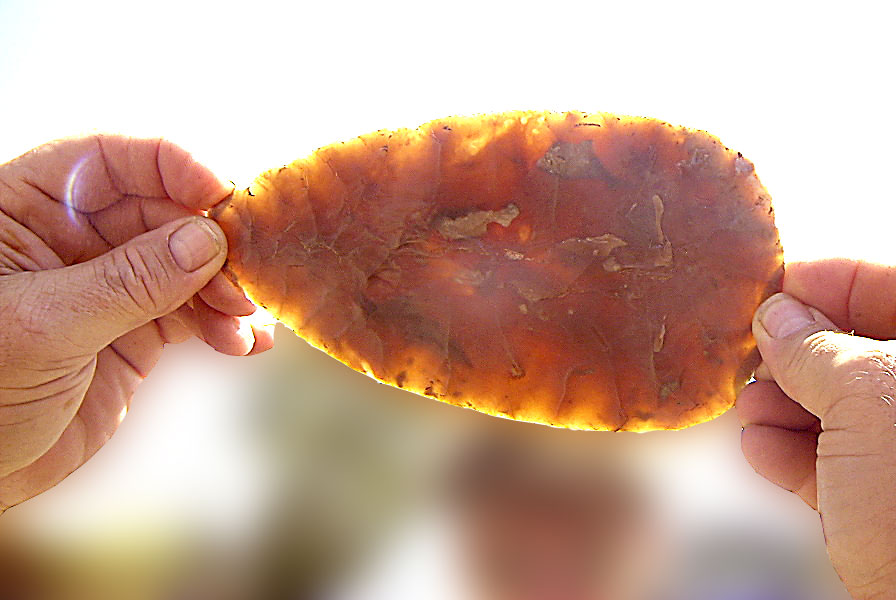
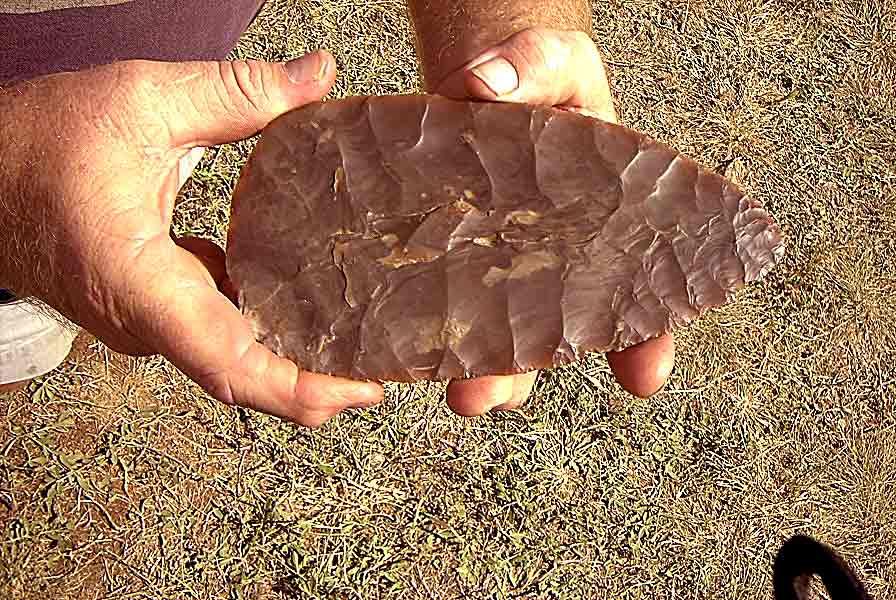
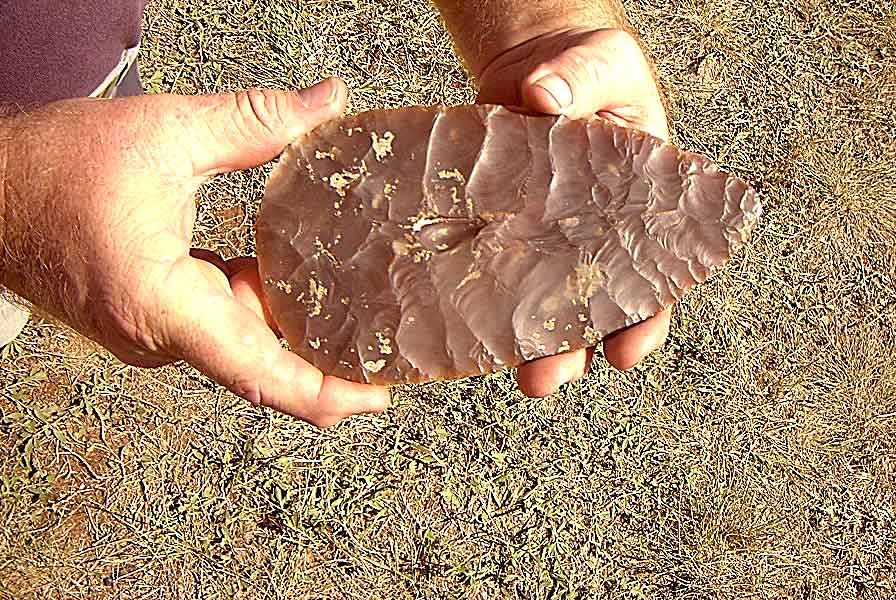
I mentioned the Walnut Creek Biface in my "Got Convex" article but just realized I don't have any pictures of it on here. You can read more about it at http://www.stoneage1.com/knap/walnut.html
and http://www.dirtbrothers.org/ashley/ashleyarticle.html
Here are a few pictures of it.


and http://www.dirtbrothers.org/ashley/ashleyarticle.html
Here are a few pictures of it.
Tuesday, November 8, 2011
Interview with Jake Webster
I first noticed Jake Webster's gallery on Flintknappers.com in August 2011. His unique designs and different style points immediately caught my eyes. As I have wrote before, I believe that thinking outside of the box and making your own new designs is the nature and a sign of a true artist. This is one of the basic tenants of our philosophy at Modern Flintknapping, thus our motto "Keep Pushing the Boundaries of Flintknapping".
In reading his bio on his gallery I seen he credited fellow knapper Ed Mosher as being a big help to him in his knapping development. I am friends with Ed and knew he would be attending the Flint Ridge knapin the following month, so I hoped I could meet Jake there. I meet Ed shortly after arriving at the knapin and he said Jake was coming but I left Ed's booth before Jake arrived. But before I left, someone mentioned in a discussion among several people that Jake was a flintknapping prodigy.
The next day while at my booth two guys came up that I did not know and started looking at our table display. I heard one(who turned out to be Aaron Lincoln) refer to the other as "Jake". I asked, are you Jake Webster? He replied yes. I told him I had been admiring his work on his gallery. I also told him that I had heard someone say he was a flintknapping prodigy. Jake seems like a modest person and I think this embarrassed him a little.
Please visit Jake's gallery on www.flintknappers.com and check out his unique work.
Below is my interview with Jake.
I see on your gallery bio that you started knapping when you was 12 yrs. old and you have been knapping for 11 yrs now, do I have this right? So you are 23 yrs old now?
Yes I am currently 23 and been chipping off and on since I was 12. Field flakes with an antler tine at the start, till walking around the Johnny Appleseed festival I saw a knapper. I was appalled by all the precious flint material he had that in my eyes at the time looked more valuable then gold! I watched and watched until my parents grew tired of the monotonous routine, they had to practically drag me away. Before I left this very generous knapper (Who I don't know and remains anonymous in my memory) grabbed a bag and started piling in the flakes at his feet for me! I remember hearing each "tink" as the flakes collided and thought it was a heavenly sound. The main thing that I took away from watching him was he was "beating" the stone with a large antler! I had to improvise. So one day while shooting my bow in the woods where I live. I found an old butter knife and had an "Ah ha!" moment I instantly ran back to the house grabbed my bowl of material and began striking away. Little did I know this was my first time doing percussion work. So like any kid who gets into mischief as did I because as soon as the back end of my improvised "butter knife bopper" would warp or get to chewed up to continue on, I'd go retrieve another. FROM OUR SILVERWARE DRAWER!! haha.. Mom wasn't very pleased about that one .So I waited until I was able to get my first antler billet from an auctioned off knapping kit. I was very excited.
My first drive in making these points was shear fascination and wanting to know how the heck these ancient guys where able to send a flake scar any where and every where on there points. This was all around the same time that I was getting into traditional archery and was always curious if one of these stone points would actually "do the trick", of course since man had been using them for thousands of years there was no doubt in my mind that they were stone hard killers. I then started toying with the idea of wanting to try to haft up a point and actually try. but had no knowledge of where to begin really.. Around age 15 I was able to produce thick, wavy, unstraight points that I was very proud of yet couldn't seem how to thin out my works.. It took me one more whole year just to learn how to do the "thinning" process and it just happened. Flintknapping was on my mind 24/7 I had the "bug" and so it wasn't uncommon for me to wake up in the morning and while laying in bed think of new tactics and avenues of approach in this challenging time. Most ideas ended in frustration and never panned out, but the few that did lead me further down the rabbit hole in getting a little better.
And you started out making points to deer hunt with, is this correct?
So at age 16 I decided it was time to try to kill my first deer with my 50# Slim Line Red Wing Recurve bow. I made the tough decision to pick out my very best point at the time (which was still VERY primitive) and haft it up. I told myself if i'm going to attempt this the deer is owed my very best point it was the most "ethical" thing to do anyhow when I could have been using a perfect modern steel point. So I used a ban saw to cut up three of the arrows that I put together and cut a slit and hafted them with epoxy and artificial sinew and a few days later there I was opening day of archery season with an Indiana Hornstone flint point arrow knocked.When a 6 point buck came trotting in and stopped 20yds broadside to me, I raised my recurve aimed at his arm pit and let her fly. My arrow landed in its designated parking spot that I assigned for it and that deer bucked fell over and took off running. I COULDN'T believe my eyes! I instantly wanted to go see what happened but waited a grueling 30 minutes. Dad and I looked for blood and found none. I instantly felt sick that my point didn't do the trick.. upon following where I'd seen my deer run towards I found my arrow! about 8 inches of blood on the shaft and the point plus some shaft was missing. I took a few more steps and saw my deer dead in front of me 20 yds up! WOW I was excited! I never did retrieve the point however.
You state in your bio that 6 months ago you meet Ed Mosher and Aaron Lincoln and they have helped you improve your flintknapping skills greatly. How did you meet them? In what ways have they helped you?
I met Ed about a year ago at the Johnny Appleseed festival and the battle of 1812 festival. I was 22 at this point and had been entirely self taught only seeing one live knapper when I was a kid. I knew there was still much to learn and just knapping with someone else would greatly help. I watched Ed for awhile and then got a business card from him. I contacted him maybe once every two weeks so I didn't feel like a bother to him and finally asked if I could just come knap with him and get lessons. So Ed was the first other knapper I ever knapped with and I was hooked! He answered so many questions to various things I wanted to do whether by just watching or asking. Upon my departure he gave me a coffee can and bag full of flakes and material. Truly generous. He gave me a contact for Aaron Lincoln who lives in Fort Wayne close to me and since I met him we have been knapping 2 days a week together on average sometimes more or less. Aaron helped me out with learning how to keep my notches from rounding out on me and boosted my confidence in every way! He constanty challenged me to do things I thought way above my skills. But I could never refuse a good challenge and would always strive to meet his request if not that day then I would continue until I achieved what I wanted to achieve. He gave me the skill set to never give up or stop trying.
You have many uniquely designed pieces that I would like to ask you about. Basically my questions for all of them is what is your inspiration for your point designs, do you go through a process to develop these designs or do they just come to you?
First, are the "ghost" points, these were the first to catch my eye on your gallery. You have several variations of them, snyders, corner, heart, and an eccentric. Where did you get the idea for these?
Typically my thought process in designing my points is what would turn heads. I want to get attention and known among my fellow knappers and I'm not going to get that making the same thing every one else makes. So I came up with the "Ghost" point and label each with my name so that I have something out there that is somewhat original to me. Like a signature point in the knapping community. I learned how to do this point style while knapping with Aaron over the winter and fell in love with notching points mainly because I just learned and was still learning how to get them deep. Aaron challenged me to make a fish hook like one he made and I raced to start. I broke so many of those little things and frustration had sunk in.. UNTIL I learned what I was doing wrong. Little did I know that just the slightest torque or bending force you put on a point will snap it every time and thats what I was doing to these hooks! So I grabbed a paint stirring stick cut it to match my leather pad and was able to start cranking out fish hooks! This hollowing out process became very fun to me when the idea hit me. Could this work on a point? with notches?? I don't know how many casualties of nice points I lost through this learning and developing process but it was worth it.
The "Ghost" point style ideas just came through wanting to challenge myself because every time I do I learn immensely.
You also have some small eccentric points, the "watchyamacullit" and the flint ridge point. Is eccentrics some of your favorites?
I love doing eccentrics because they allow me to be creative in any way I want. Nobody can tell me that its wrong like they might if I were going for a replica. Its my own design and they are all almost totally original. That's why I would encourage EVERY flintknapper to try some eccentric work. You will learn a lot the more you do. It helps you understand the stone better because your being challenge more and have less room for error. That means you must be more precise and actually have meaning to why and how you take each flake. Every flintknapper is different and there work is different, no two knappers knap alike, thats why sometimes you can just see a point and say thats a "Mosher" or thats a "Lincoln" etc.. detail is key! Go the extra mile to make it look how you want it. take chance hits your work will show the extra love and pride put in and you might just surprise yourself with what you can do!
You do some animal effigy pieces such as an eagle and buffalo. I really like that you do some designs that aren't in a point design. Have you done other types of animals and any ideas for future ones?
I have done several animals sharks, buffalos, eagles, wolves, bears, indian heads, turtles and even a perched bird. They are time consuming but fun because of the amount of detail required.
Other point designs that I like are the deep notched point, rocket point, crusaders shield and the neat pendant. Any comments on these points?
The "rocket" point is my newest favorite. I love the intricate sleek design and thoroughly have fun doing the fine work involved. I love deep notching as well because it keeps challenging me and my skills brushed up!
You also take some old artifact designs and add your artistic flair to them, such as the sallisaw, lake eerie, columbia and texas duran. Do you like to "amp up" old artifact designs?
Yes I love to "Amp" them up! I feel it adds a little modern in with the old and think it just adds that extra touch to my work. I know that my work doesn't and wont please every one, but as long as each piece appeals to me then im still having fun with my knapping. I find it very fun to push the boundaries of traditional points as well as modern styles. its good to do a little of everything.
As a side note, I find it very interesting that Jake and my father have similar stories as far as how they taught themselves to knap at a young age and went years without any contact with any other knappers. I believe this helps a person to always think outside of the box in their future flintknapping endeavors, because they had to think this way while trying to learn on their own.
I want to thank Jake for doing this interview with us here at Modern Flintknapping.
Monday, June 20, 2011
Val Waldorf's Illustrations
In the last two editions of CHIPS Vol. 23 no 2 and 3, in the article titled "Scar Patterns An Illustrated Guide" D.C. Waldorf wrote about how his late wife Val took special interest in capturing accurate portrayal in her illustrations of stone tools. D.C. wrote quote "In her work illustrating stone tools, accurate portrayal of flake scares was everything! Right down to the texture of the material, shading of the negative bulbs, the flow and intensity of the ripples, the radial splits caused by the bending of the stone under the force of the blow, and even the "tearing" along the scar junctures that is often seen in very fine grained rocks was all subject to her pen. If it aided in the interpretation or reading of the scars, then she made sure it was there."
Later in the article D.C. gave a quote from Val which she wrote about her illustrations that appeared in CHIPS Vol. 5, no 1, 1993 which read, quote "Using arced lines, and varying the spacing between them, you can approximate the depth of the compression rings[ripples]"
If you have read my previous article on this blog dated August 7, 2009 titled "Replicating the Sweetwater blade" you will know that the uniform rippling effect of the compression rings is our main evidence in our belief that the Sweetwater blade was actually finished with pressure flakes. You can read the article at http://modern-flintknapping.blogspot.com/2009/08/replicating-sweetwater-blade.html and see pictures of the compression rings at http://modern-flintknapping.blogspot.com/2009/08/this-link-is-picture-that-shows.html
In our video "Replicating the Sweetwater Biface" we discuss this in more detail.
So I was very happy to see in part II of D.C's article of Scar Patterns in vol 23 no 3 there was a picture of Val's illustration of the Sweetwater Biface which has never been shown before according to D.C. In the illustration you can clearly see the uniform rippling effect of compression rings. I must commend Val on her ability to capture this very important feature of the blade!
I do not intend to infer that D.C accepts our theory that the Sweetwater was finished with pressure flaking. In the contrary, according to his article I have been referencing he believes it was done with percussion.
My only point is Val was able to capture the compression rings rippling in her illustrations which illustrates what we have been saying very well. I wish I would have been aware of this Sweetwater illustration when I wrote my original article on this topic.
For those who do not receive CHIPS, below is a scanned picture of the Val's illustration of the Sweetwater Biface found on page 7 of Vol. 23 no 3.

Later in the article D.C. gave a quote from Val which she wrote about her illustrations that appeared in CHIPS Vol. 5, no 1, 1993 which read, quote "Using arced lines, and varying the spacing between them, you can approximate the depth of the compression rings[ripples]"
If you have read my previous article on this blog dated August 7, 2009 titled "Replicating the Sweetwater blade" you will know that the uniform rippling effect of the compression rings is our main evidence in our belief that the Sweetwater blade was actually finished with pressure flakes. You can read the article at http://modern-flintknapping.blogspot.com/2009/08/replicating-sweetwater-blade.html and see pictures of the compression rings at http://modern-flintknapping.blogspot.com/2009/08/this-link-is-picture-that-shows.html
In our video "Replicating the Sweetwater Biface" we discuss this in more detail.
So I was very happy to see in part II of D.C's article of Scar Patterns in vol 23 no 3 there was a picture of Val's illustration of the Sweetwater Biface which has never been shown before according to D.C. In the illustration you can clearly see the uniform rippling effect of compression rings. I must commend Val on her ability to capture this very important feature of the blade!
I do not intend to infer that D.C accepts our theory that the Sweetwater was finished with pressure flaking. In the contrary, according to his article I have been referencing he believes it was done with percussion.
My only point is Val was able to capture the compression rings rippling in her illustrations which illustrates what we have been saying very well. I wish I would have been aware of this Sweetwater illustration when I wrote my original article on this topic.
For those who do not receive CHIPS, below is a scanned picture of the Val's illustration of the Sweetwater Biface found on page 7 of Vol. 23 no 3.

Saturday, December 4, 2010
A Wenatchee flute theory
Just how were the Wenatchee style points fluted? There has been much discussion on this topic. Was direct percussion used, or indirect percussion with a punch, or were they pressured with some sort of jig?
Bill has a theory. Could a simpletool used for another purpose by the people of that time actually have a dual function? That being the atlatl spear throwing stick. Could an atlatl be used as a support device for direct percussion fluting, helping to stabilize the point, remove stress from the point and allow for adjustment in hand movements to vary striking angles. All of which allow for more successful fluting with less breakage. Bill thought it was a possibility, so he designed a similar device and it has worked very well. He has successfully fluted on both sides of seven points at this time with a 90% success rate, with points ranging from 6-7 1/4 inches in length.
Bill's next goal is to flute one around 9 inches long with similar width/length and flute dimensions as the Wenatchee style artifacts.
Below are pictures of his apparatus and points produced using it.
Here is a link to a discussion of this topic on the Paleo Planet web forum. http://paleoplanet69529.yuku.com/topic/39994/t/A-Wenatchee-flute-theory.html

This is his first design.

This shows how the point is attached and secured with rope to the device. Leather padding can be used to adjust the point up/down and outwards for various striking angles.

This shows how the point is struck to remove the flute.

This is a second more modern design which allows for adjustment of the point without having to use padding. This just makes the process easier and faster for the modern knapper. This device is around 12 inches long.

The platform where the end of the point is placed is adjustable with a wing nut.

This shows how the point is struck to remove the flute using this device.

One of the fluted points using this method. Bill has left the nipple on the point so it can be seen. This particular flute is deep and wide. The flute dimensions can be changed by changing the nipple platform and the convex in the point.

The same fluted point showing the flute spalls removed from both sides. This point is right at 7 1/4 inches long.

Some of the various points made using this method. All of them have been fluted on both sides.
Bill has a theory. Could a simple
Bill's next goal is to flute one around 9 inches long with similar width/length and flute dimensions as the Wenatchee style artifacts.
Below are pictures of his apparatus and points produced using it.
Here is a link to a discussion of this topic on the Paleo Planet web forum. http://paleoplanet69529.yuku.com/topic/39994/t/A-Wenatchee-flute-theory.html

This is his first design.

This shows how the point is attached and secured with rope to the device. Leather padding can be used to adjust the point up/down and outwards for various striking angles.

This shows how the point is struck to remove the flute.

This is a second more modern design which allows for adjustment of the point without having to use padding. This just makes the process easier and faster for the modern knapper. This device is around 12 inches long.

The platform where the end of the point is placed is adjustable with a wing nut.

This shows how the point is struck to remove the flute using this device.

One of the fluted points using this method. Bill has left the nipple on the point so it can be seen. This particular flute is deep and wide. The flute dimensions can be changed by changing the nipple platform and the convex in the point.

The same fluted point showing the flute spalls removed from both sides. This point is right at 7 1/4 inches long.

Some of the various points made using this method. All of them have been fluted on both sides.
Thursday, September 9, 2010
From Copper to Antler
While at the Flint Ridge knapin, we decided to try an experiment, that as far as we know hasn't been done before. After seeing Ed Mosher, make an 8.5/1 W/T ratio from one of Bill's copper billeted glass preforms on his first try with a moose billet. Bill decided with Ed's agreement, to make a preform more to Ed's liking while using a copper billet. Ed instructed Bill as he went, on what kind of platforms he preferred for his moose billet. Once Ed was happy with the preform, he finished the blade with his moose. He ended up getting a blade with an average W/T ratio of 10.3/1! Not bad for only the second blade Ed had made from this glass.
Bill said the biggest difference he noticed in the platforms that Ed preferred for the moose compared to what Bill would do normally set for copper was the platforms were much thinner. Both Ed and Bill seemed very intrigued with the experiment, getting into some deep discussions on platforms. Bill has never used much antler and was very impressed with what Ed could do with it and Bill certainly learned a lot.
Below are some pictures, first Ed watching and instructing Bill on preferred platforms, then Bill
watching Ed's moose antler work at Tom Chissum's booth.


Below is the finishedblade , like I said, W/T of 10.3/1 on second try, nice work Ed! Not to mention that Bill felt if he had gotten a few better platforms set for Ed, he could have done better.
This blade is now in Sweden!
Thisblade has a score of 793 using the Modern Flintknapping Scoring System. For more info. on the scoring system check out http://www.modern-flintknapping.com/grading-system.html


Bill said the biggest difference he noticed in the platforms that Ed preferred for the moose compared to what Bill would do normally set for copper was the platforms were much thinner. Both Ed and Bill seemed very intrigued with the experiment, getting into some deep discussions on platforms. Bill has never used much antler and was very impressed with what Ed could do with it and Bill certainly learned a lot.
Below are some pictures, first Ed watching and instructing Bill on preferred platforms, then Bill
watching Ed's moose antler work at Tom Chissum's booth.


Below is the finished
This blade is now in Sweden!
This


Subscribe to:
Posts (Atom)